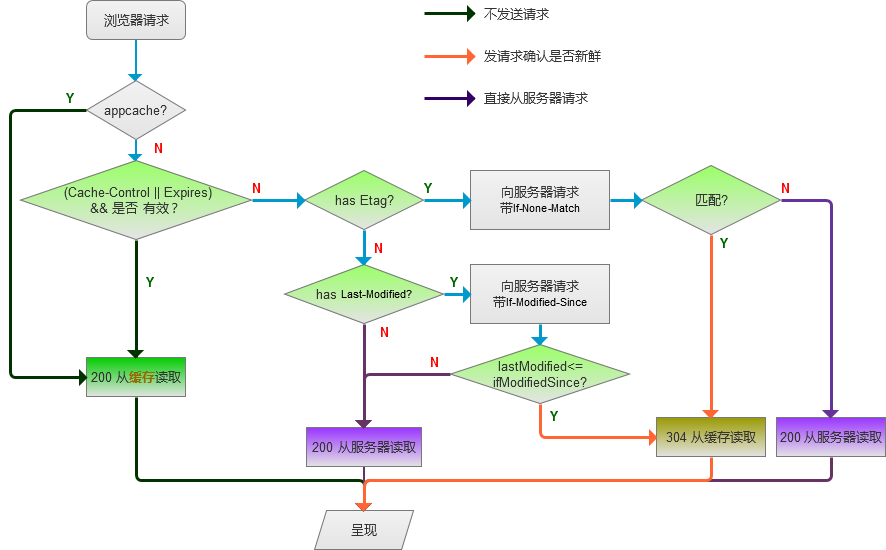
两张图阐述浏览器缓存策略
作者存档: nick - 第5页
浏览器缓存策略
CentOS7使用firewalld配置
1、firewalld的基本使用
启动: systemctl start firewalld
查看状态: systemctl status firewalld
停止: systemctl disable firewalld
禁用: systemctl stop firewalld
2.systemctl是CentOS7的服务管理工具中主要的工具,它融合之前service和chkconfig的功能于一体。
启动一个服务:systemctl start firewalld.service
关闭一个服务:systemctl stop firewalld.service
重启一个服务:systemctl restart firewalld.service
显示一个服务的状态:systemctl status firewalld.service
在开机时启用一个服务:systemctl enable firewalld.service
在开机时禁用一个服务:systemctl disable firewalld.service
查看服务是否开机启动:systemctl is-enabled firewalld.service
查看已启动的服务列表:systemctl list-unit-files|grep enabled
查看启动失败的服务列表:systemctl –failed
3.配置firewalld-cmd
查看版本: firewall-cmd –version
查看帮助: firewall-cmd –help
显示状态: firewall-cmd –state
查看所有打开的端口: firewall-cmd –zone=public –list-ports
更新防火墙规则: firewall-cmd –reload
查看区域信息: firewall-cmd –get-active-zones
查看指定接口所属区域: firewall-cmd –get-zone-of-interface=eth0
拒绝所有包:firewall-cmd –panic-on
取消拒绝状态: firewall-cmd –panic-off
查看是否拒绝: firewall-cmd –query-panic
那怎么开启一个端口呢
添加
firewall-cmd –zone=public –add-port=80/tcp –permanent (–permanent永久生效,没有此参数重启后失效)
重新载入
firewall-cmd –reload
查看
firewall-cmd –zone= public –query-port=80/tcp
删除
firewall-cmd –zone= public –remove-port=80/tcp –permanent
kill signal
HUP 1 终端断线
INT 2 中断(同 Ctrl + C)
QUIT 3 退出(同 Ctrl + \)
KILL 9 强制终止
TERM 15 终止
CONT 18 继续(与STOP相反, fg/bg命令)
STOP 19 暂停(同 Ctrl + Z
tcpdump监听网卡上tcp通信
tcpdump是一款网络抓包工具。它可以监听网络接口不同层的通信,并过滤出特定的内容,比如特定协议、特定端口等等。我们上面已经使用tcpdump监听了ARP协议通信。这里我们来看更多的监听方式。
sudo tcpdump -i en0
监听en0接口的所有通信
sudo tcpdump -A -i en0
用ASCII显示en0接口的通信内容
sudo tcpdump -i en0 ‘port 8080’
显示en0接口的8080端口的通信
sudo tcpdump -i eth1 src 192.168.1.200
显示eth1接口,来自192.168.1.200的通信
sudo tcpdump -i eth1 dst 192.168.1.101 and port 80
显示eth1接口80端口,目的地为192.168.1.101的通信
sudo tcpdump -w record.pcap -i lo0
将lo0接口的通信存入文件record.pcap
curl 常用用法
-F,以multipart/form-data的方式发送POST请求
curl -F "key=value" -F "filename=@file" http://xxx/upload
-H, 添加Header内容
curl -H "Content-Type: application/json" -X POST -d '{"username":"xyz","password":"xyz"}' http://xxx/api
-d, 以application/x-www-url-encoded格式上传参数
curl -d "action=dosth" -d "name=xxx" http://xxx/api
-o, 输出到文件,可以指定下载文件
curl http://xxx/xxx -o file
nginx proxy_cache 静态资源缓存
直接贴上nginx.conf
#cache begin
    proxy_buffering on;
    proxy_cache_valid any 10m;
    proxy_cache_path /data/nginx/cache levels=1:2 keys_zone=nginxcache:8m max_size=10g inactive=30d;
    proxy_temp_path /data/nginx/temp;
    proxy_buffer_size 4k;
    proxy_buffers 100 8k;
#cache end

server {
        listen       80 default_server;
        listen       [::]:80 default_server;
        server_name  tixbay.net;
        root         /data/nginx/www;

        # Load configuration files for the default server block.
        include /etc/nginx/default.d/*.conf;

        location ~ .*\.(jpg|jpeg|png|gif|js|css)?$ { #一般只缓存静态资源
                proxy_cache nginxcache; #与keys_zone对应
                proxy_cache_valid  200 206 304 301 302 10d;
                proxy_cache_key $scheme$uri$is_args$args; #缓存key
                proxy_redirect off;
                proxy_set_header Host $host;
                proxy_set_header X-Real-IP $remote_addr;
                proxy_set_header REMOTE-HOST $remote_addr;
                proxy_set_header X-Forwarded-For $proxy_add_x_forwarded_for;
                client_max_body_size 100m;
                proxy_pass http://tunnelhome;
        }

        location / { #其他默认处理
                proxy_redirect off;
                proxy_set_header Host $host;
                proxy_set_header X-Real-IP $remote_addr;
                proxy_set_header REMOTE-HOST $remote_addr;
                proxy_set_header X-Forwarded-For $proxy_add_x_forwarded_for;
                client_max_body_size 100m;
                proxy_pass http://tunnelhome;
        }
}
nginx 负载均衡
Nginx中upstream有以下几种方式:
1、轮询(weight=1)
默认选项,当weight不指定时,各服务器weight相同, 每个请求按时间顺序逐一分配到不同的后端服务器,如果后端服务器down掉,能自动剔除。
upstream bakend {
server 192.168.1.10;
server 192.168.1.11;
}
2、weight
指定轮询几率,weight和访问比率成正比,用于后端服务器性能不均的情况。
如果后端服务器down掉,能自动剔除。
比如下面配置,则1.11服务器的访问量为1.10服务器的两倍。
upstream bakend {
server 192.168.1.10 weight=1;
server 192.168.1.11 weight=2;
}
3、ip_hash
每个请求按访问ip的hash结果分配,这样每个访客固定访问一个后端服务器,可以解决session不能跨服务器的问题。
如果后端服务器down掉,要手工down掉。
upstream resinserver{
ip_hash;
server 192.168.1.10:8080;
server 192.168.1.11:8080;
}
4、fair(第三方插件)
按后端服务器的响应时间来分配请求,响应时间短的优先分配。
upstream resinserver{
server 192.168.1.10:8080;
server 192.168.1.11:8080;
fair;
}
5、url_hash(第三方插件)
按访问url的hash结果来分配请求,使每个url定向到同一个后端服务器,后端服务器为缓存服务器时比较有效。
在upstream中加入hash语句,hash_method是使用的hash算法
upstream resinserver{
server 192.168.1.10:8080;
server 192.168.1.11:8080;
hash $request_uri;
hash_method crc32;
}
设备的状态有:
1.down 表示单前的server暂时不参与负载
2.weight 权重,默认为1。 weight越大,负载的权重就越大。
3.max_fails 允许请求失败的次数默认为1。当超过最大次数时,返回proxy_next_upstream 模块定义的错误
4.fail_timeout max_fails次失败后,暂停的时间。
5.backup 备用服务器, 其它所有的非backup机器down或者忙的时候,请求backup机器。所以这台机器压力会最轻。
nginx基本配置与参数说明
nginx基本配置与参数说明
#运行用户
user nobody;

#启动进程,通常设置成和cpu的数量相等
worker_processes  1;

#全局错误日志及PID文件
#error_log  logs/error.log;
#error_log  logs/error.log  notice;
#error_log  logs/error.log  info;
#pid        logs/nginx.pid;

#工作模式及连接数上限
events {
    #epoll是多路复用IO(I/O Multiplexing)中的一种方式,
    #仅用于linux2.6以上内核,可以大大提高nginx的性能
    use   epoll;

    #单个后台worker process进程的最大并发链接数
    worker_connections  1024;
    # 并发总数是 worker_processes 和 worker_connections 的乘积
    # 即 max_clients = worker_processes * worker_connections
    # 在设置了反向代理的情况下,max_clients = worker_processes * worker_connections / 4  为什么
    # 为什么上面反向代理要除以4,应该说是一个经验值
    # 根据以上条件,正常情况下的Nginx Server可以应付的最大连接数为:4 * 8000 = 32000
    # worker_connections 值的设置跟物理内存大小有关
    # 因为并发受IO约束,max_clients的值须小于系统可以打开的最大文件数
    # 而系统可以打开的最大文件数和内存大小成正比,一般1GB内存的机器上可以打开的文件数大约是10万左右
    # 我们来看看360M内存的VPS可以打开的文件句柄数是多少:
    # $ cat /proc/sys/fs/file-max
    # 输出 34336
    # 32000 < 34336,即并发连接总数小于系统可以打开的文件句柄总数,这样就在操作系统可以承受的范围之内
    # 所以,worker_connections 的值需根据 worker_processes 进程数目和系统可以打开的最大文件总数进行适当地进行设置
    # 使得并发总数小于操作系统可以打开的最大文件数目
    # 其实质也就是根据主机的物理CPU和内存进行配置
    # 当然,理论上的并发总数可能会和实际有所偏差,因为主机还有其他的工作进程需要消耗系统资源。
    # ulimit -SHn 65535
}
#设定http服务器
http {
    #设定mime类型,类型由mime.type文件定义
    include    mime.types;
    default_type  application/octet-stream;

    #设定日志格式
    log_format  main  '$remote_addr - $remote_user [$time_local] "$request" '
                  '$status $body_bytes_sent "$http_referer" '
                  '"$http_user_agent" "$http_x_forwarded_for"';
    ss_log  logs/access.log  main;

    #sendfile 指令指定 nginx 是否调用 sendfile 函数(zero copy 方式)来输出文件,
    #对于普通应用,必须设为 on,
    #如果用来进行下载等应用磁盘IO重负载应用,可设置为 off,
    #以平衡磁盘与网络I/O处理速度,降低系统的uptime.
    sendfile     on;

    #tcp_nopush     on;
    #连接超时时间
    #keepalive_timeout  0;
    keepalive_timeout  65;

    tcp_nodelay     on;

    #FastCGI相关参数是为了改善网站的性能:减少资源占用,提高访问速度。下面参数看字面意思都能理解。
    fastcgi_connect_timeout 300;
    fastcgi_send_timeout 300;
    fastcgi_read_timeout 300;
    fastcgi_buffer_size 64k;
    fastcgi_buffers 4 64k;
    fastcgi_busy_buffers_size 128k;
    fastcgi_temp_file_write_size 128k;

    #upstream的负载均衡,(以权重方式分发),weight是权重,可以根据机器配置定义权重。weigth参数表示权值,权值越高被分配到的几率越大。
    upstream blog.nginx.com {
        server 192.168.80.121:80 weight=3;
        server 192.168.80.122:80 weight=2;
        server 192.168.80.123:80 weight=3;
    }

    #upstream的负载均衡,(以nginx热备方式分发),其它所有的非backup Server down或者忙的时候,请求backup机器。所以这台机器压力会最轻。
    upstream blog.nginx.com {
        server 192.168.80.121:80;
        server 192.168.80.122:80;
        server 192.168.80.123:80 backup;
    }

    #开启gzip压缩
    gzip  on;
    gzip_disable "MSIE [1-6].";

    #设定请求缓冲
    client_header_buffer_size    128k;
    large_client_header_buffers  4 128k;

    #设定虚拟主机配置
    server {
        #侦听80端口
        listen    80;

        #定义访问地址,域名可以有多个,用空格隔开
        server_name www.nginx.cn nginx.cn ;

        #定义服务器的默认网站根目录位置
        root html;

        #设定本虚拟主机的访问日志
        access_log  logs/nginx.access.log  main;

        #默认请求
        location / {
           #定义首页索引文件的名称
           index index.php index.html index.htm;
        }

        #对 “/” 启用反向代理
        location / {
            proxy_pass http://127.0.0.1:88;
            proxy_redirect off;
            proxy_set_header X-Real-IP $remote_addr;
            #后端的Web服务器可以通过X-Forwarded-For获取用户真实IP
            proxy_set_header X-Forwarded-For $proxy_add_x_forwarded_for;
            #以下是一些反向代理的配置,可选。
            proxy_set_header Host $host;
            client_max_body_size 10m; #允许客户端请求的最大单文件字节数
            client_body_buffer_size 128k; #缓冲区代理缓冲用户端请求的最大字节数,
            proxy_connect_timeout 90; #nginx跟后端服务器连接超时时间(代理连接超时)
            proxy_send_timeout 90; #后端服务器数据回传时间(代理发送超时)
            proxy_read_timeout 90; #连接成功后,后端服务器响应时间(代理接收超时)
            proxy_buffer_size 4k; #设置代理服务器(nginx)保存用户头信息的缓冲区大小
            proxy_buffers 4 32k; #proxy_buffers缓冲区,网页平均在32k以下的设置
            proxy_busy_buffers_size 64k; #高负荷下缓冲大小(proxy_buffers*2)
            proxy_temp_file_write_size 64k;
            #设定缓存文件夹大小,大于这个值,将从upstream服务器传
        }

        #设定查看Nginx状态的地址
        location /NginxStatus {
            stub_status on;
            access_log on;
            auth_basic “NginxStatus”;
            auth_basic_user_file conf/htpasswd;
            #htpasswd文件的内容可以用apache提供的htpasswd工具来产生。
        }

        #本地动静分离反向代理配置
        #所有jsp的页面均交由tomcat或resin处理
        location ~ .(jsp|jspx|do)?$ {
            proxy_set_header Host $host;
            proxy_set_header X-Real-IP $remote_addr;
            proxy_set_header X-Forwarded-For $proxy_add_x_forwarded_for;
            proxy_pass http://127.0.0.1:8080;
        }

        #所有静态文件由nginx直接读取不经过tomcat或resin
        location ~ .*.(htm|html|gif|jpg|jpeg|png|bmp|swf|ioc|rar|zip|txt|flv|mid|doc|ppt|pdf|xls|mp3|wma)$ {
            expires 15d;
        }
        location ~ .*.(js|css)?$ {
            expires 1h;
        }

        # 定义错误提示页面
        error_page   500 502 503 504 /50x.html;
        location = /50x.html {
        }

        #静态文件缓存时间设置,nginx自己处理
        location ~ ^/(images|javascript|js|css|flash|media|static)/ {
            #过期30天,静态文件不怎么更新,过期可以设大一点,
            #如果频繁更新,则可以设置得小一点。
            expires 30d;
        }

        #PHP 脚本请求全部转发到 FastCGI处理. 使用FastCGI默认配置.
        location ~ .php$ {
            fastcgi_pass 127.0.0.1:9000;
            fastcgi_index index.php;
            fastcgi_param  SCRIPT_FILENAME  $document_root$fastcgi_script_name;
            include fastcgi_params;
        }

        #禁止访问 .htxxx 文件
        location ~ /.ht {
            deny all;
        }
    }
}


近期评论